 Inkhaus
Getting started#
Inkhaus is the free software that turns an M5Stack M5Paper (an e-ink touch screen with a battery) into a remote for Home Assistant. This page takes you from an unopened box to a working dashboard. It needs about 20 minutes and no programming. If a step goes wrong, each step has an "If it doesn't work" line, and page Troubleshooting has more.
What you need#
- An M5Stack M5Paper, the original one (not the M5Paper S3).
- A USB-C cable that carries data. Some cables only charge: if your computer does not see the device, try another cable.
- A microSD card formatted as FAT32 (not exFAT). A card of 32 GB or less is the easiest: new cards usually come as FAT32 already. If you must format it yourself: on macOS use Disk Utility with "MS-DOS (FAT)"; on Windows right-click the card, Format, File system FAT32. Windows Explorer offers FAT32 only up to 32 GB. For a bigger card (64 GB and up) use a small free tool such as "guiformat" (Windows) or the
mkfs.vfat -F 32command (Linux), or simply use a smaller card. Formatting erases the card. - A computer with Chrome, Edge or Opera for the installation.
- A running Home Assistant that the M5Paper's Wi-Fi network can reach. The M5Paper only works on a 2.4 GHz Wi-Fi network (not 5 GHz only), and the network name must be visible (not hidden).
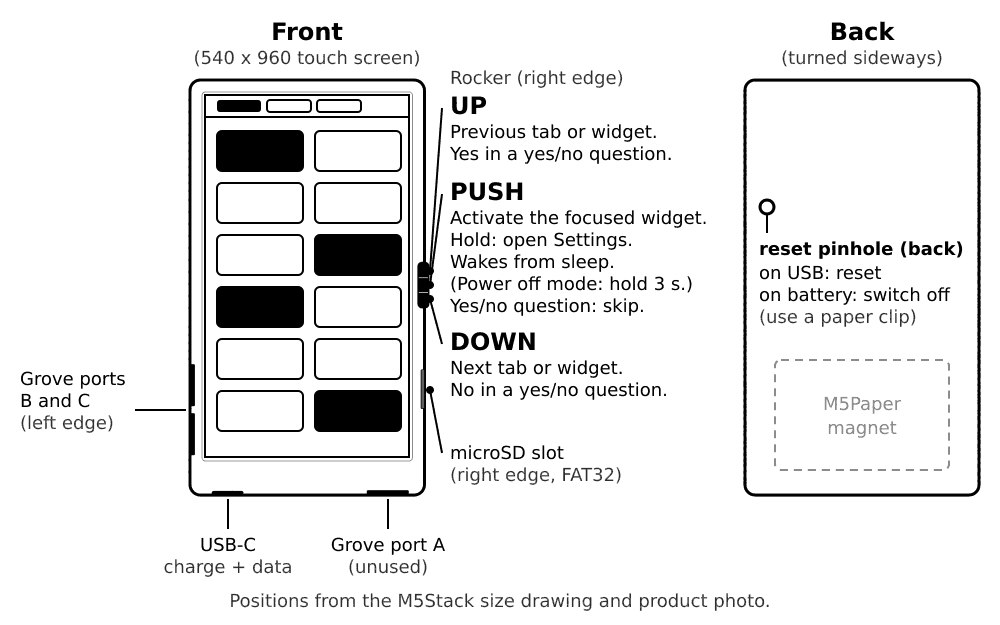
- A pin or a straightened paper clip, for the tiny reset hole ("pinhole") on the back.
The five steps#
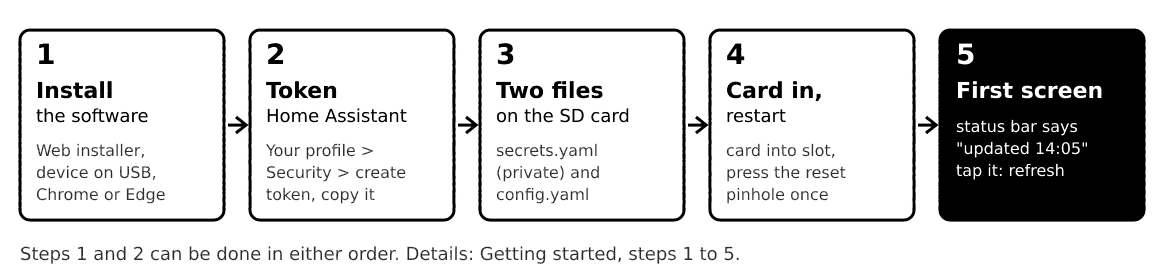
- Install the software in your browser.
- Create a Home Assistant token.
- Write two small text files and put them on the SD card.
- Put the card in the device and switch it on.
- Check the first screen.
Step 1: Install the software#
- Open the install page in Chrome, Edge or Opera.
- Plug the M5Paper into your computer with the USB-C cable.
- Press Install and pick the serial port that appears (often called "CP2104" or "USB Serial").
- Wait until the page says it is done. The device restarts by itself.
What you'll see: a progress bar on the page, then the Inkhaus logo on the device screen.
If it doesn't work: try another USB cable or port. Firefox and Safari cannot do this step: use the installer app (a program you download and run on your computer; it does the same job) from the Releases page instead. Your settings and the SD card are kept when you install again later.
Step 2: Create a Home Assistant token#
The device needs a password of its own to talk to Home Assistant. It is called a long-lived access token. Create it like this:
- Open Home Assistant in your browser.
- Click your name at the bottom of the sidebar to open your profile.
- Open the Security tab.
- Scroll down to Long-lived access tokens and press Create token.
- Name it "Inkhaus" and press OK.
- Copy the token right away. Home Assistant shows it only once. Paste it into a text file for now.
Home Assistant explains this too (the screens can differ between versions): Home Assistant: authentication, long-lived access tokens.
If it doesn't work: you can always make a new token and delete the old one, so there is no risk in trying again.
Step 3: The two files#
Inkhaus reads two plain text files from the root of the SD card (not inside a folder):
secrets.yamlis private: your Wi-Fi password, the address of Home Assistant and the token. Never share it.config.yamlis your dashboard: which widgets on which tab. It holds no secrets, so you can share it when you ask for help.
Both files are written in YAML, a plain text format made of name: value lines. Indentation (spaces at the start of a line) shows what belongs together. You do not need to know more than what the examples show. Use a plain text editor (Notepad, TextEdit in plain-text mode, VS Code). Do not use Word: it turns quotes into curly quotes. Indent with spaces, never tabs. On Windows, switch on "File name extensions" in Explorer so your file is not saved as secrets.yaml.txt.
secrets.yaml, minimal#
wifi:
  - ssid: "MyWifi"
    password: "my-wifi-password"
home_assistant:
  internal_url: http://192.168.1.10:8123
token: "paste-your-long-lived-token-here"ssidandpasswordare your Wi-Fi name and password.internal_urlis the address you use at home:http://, the IP address of Home Assistant and:8123. Home Assistant shows its IP address under Settings, System, Network. Use the IP address: names ending in.local(such ashomeassistant.local) often do not work on the device. A normal DNS name from your router (for exampleha.home) works.tokenis the token from step 2, on one line, inside the quotes. It is about 180 characters long; an editor that wraps the line on screen is fine, as long as you add no real line break.
Away from home, add external_url: https://... (it must start with https:// and needs a certificate from a normal authority, for example Let's Encrypt; a self-signed certificate is refused). More options such as several Wi-Fi networks and a fixed IP address are on the config reference.
config.yaml, minimal#
version: 1
tabs:
  - title: Home
    widgets:
      - entity: light.living_room_ceiling
      - entity: sensor.outside_temperature
      - entity: cover.living_room_shutter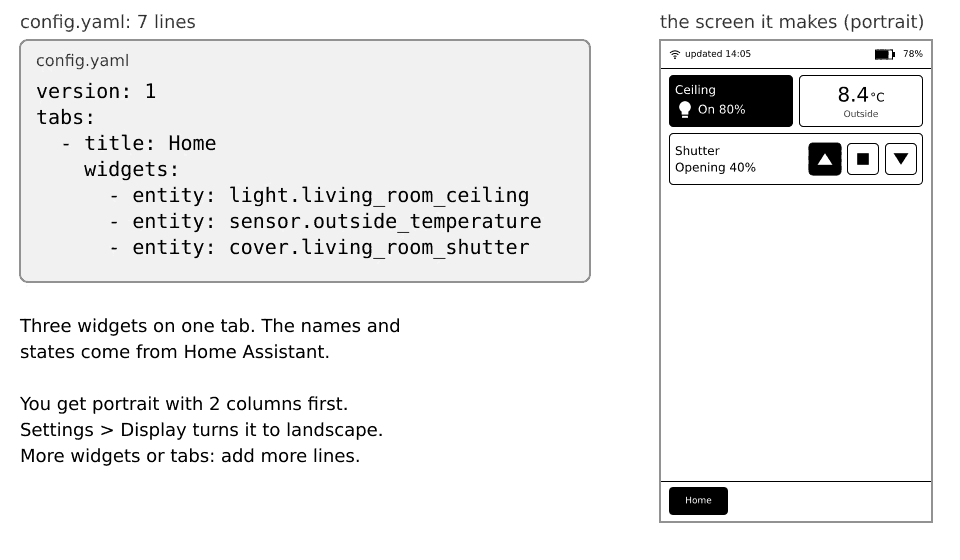
An entity is one thing in Home Assistant, such as a light. Find the ids under Settings, Devices & services, Entities: copy the "Entity ID" column (for example light.living_room_ceiling). Copy the ids exactly (they are all lowercase) and replace the three examples above with yours. If you have no shutter, delete that line: a widget for an entity that does not exist shows n/a.
If it doesn't work: the file must be called exactly config.yaml, and the spaces at the start of the lines matter. Troubleshooting shows how to read the error.
Optional, in the browser: with Chrome, Edge or Opera you can also change config.yaml (and write secrets.yaml) over the USB cable from the install page, section "Edit device config". It needs Inkhaus 1.5 or newer already on the M5Paper and a card with a first config.yaml. Nothing you type is uploaded; secrets are write-only and cleared after writing.
Step 4: First start#
- Switch the device off. It is not off after the installation: it shows the logo. Unplug the USB cable, then press the pinhole on the back once with your pin (on battery this switches it off; the screen keeps its last picture, which is normal). If it does not turn off, hold the rocker push for 2.5 seconds: that puts it to sleep, which is enough for changing the card.
- Take out the SD card and copy both files to its root.
- Put the card back (the slot is on the edge, see the picture above), then press the rocker to switch the device on (hold the push for 3 seconds if it was in Sleep mode Power off). If that does nothing, plug in the USB cable.
What you'll see: the logo, then "connecting", then your first tab, usually within 10 to 20 seconds. The screen flashes black and white once or twice: that is the e-ink screen cleaning itself.
If you have no config.yaml on the card (or Demo mode is on), you see a demo dashboard with fake values and no Wi-Fi is used. It is a nice way to try the device before you set up Home Assistant. The same happens, with your own layout but fake values, if config.yaml is there but secrets.yaml is missing or has no wifi and home_assistant parts: the device has nothing to connect with, so it stays in demo mode. Your own values appear only when both files are correct.
Step 5: What the first screen means#
At the top is a small bar with the time of the last update, the Wi-Fi state and the battery. Below it are your widgets, and at the bottom (in portrait, the default) or at the top next to the status bar (in landscape) your tabs. Your screen will look a bit different from the pictures: it starts in portrait with 2 columns, while some pictures show landscape with 5. The screen explains every part.
If the status bar says Offline, the device could not reach Home Assistant: check the Wi-Fi name, password, the address and the token, see Troubleshooting.
Next#
- Learn the screen and the buttons: The screen, Touch and buttons.
- Add more widgets: Widgets.